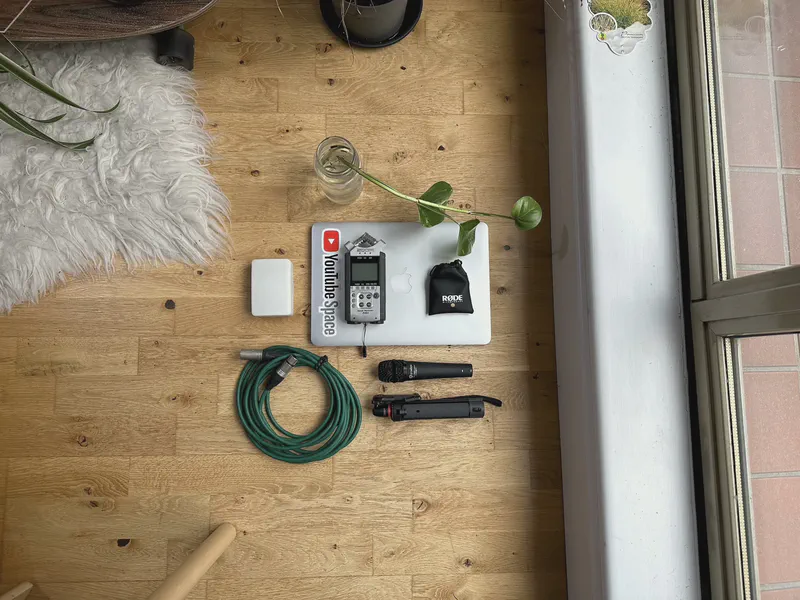
If you think you can’t start live streaming without having the best gear at your disposal, this article might be for you!
A week ago, I joined the weekly music production show Les Sondiers, straight from my parents’ house, and I had to use a portable setup.
Most of the gear I used was several years old, with a few items being in my possession for a decade or more.
Overall, the stream went smoothly, and I thought it would be useful to share my experience here. It may be good inspiration for some people.
It was quite satisfying to be able to join the livestream with this minimal setup. During the show, I had the feeling that my sound wasn’t amazing, but rewatching bits of the show on YouTube, it holds together quite well. My voice was clear, without much background noise or reverb from the room. This highlights it’s important to check our own perception. My tip: record a few seconds of audio before streaming to check quality.
Alright, let’s go through the list, now.
- Laptop and Camera: Macbook Pro (Early 2015 Model)
- Audio Interface: Zoom H4n (March 2014)
- Microphone: Rode SmartLav+ (January 2017)
- Headphones: iPhone earbuds
- Light: Aputure MC
- Light Tripod: Joby Telepod
Laptop and Camera: Macbook Pro (Early 2015 Model)
My trusty (but slightly aged) early 2015 MacBook Pro handled the stream well - although it sweated bullets.
We use Restream.io (a web-based platform) so I only really needed to run Firefox. Still, the CPU struggled a bit (browsing was sluggish) so next time I might stream at 720p instead of 1080p, trading video quality for better user experience.
I ended up using my iPad Air to do web browsing during the show, dedicating my Macbook Pro to live streaming and responding to the YouTube live chat.
The integrated webcam needed a good light to avoid “potato quality” (my Logitech C920 back in London would be a good enough upgrade).
The laptop was probably the weakest link of my setup, but it did a decent job.
Audio Interface: Zoom H4n (March 2014)
A great feature of the Zoom H series (handheld audio recorders) is that they double as a USB audio interface. Perfect when I’m on the go and need to plug a microphone into my laptop.
It works out of the box without any special drivers. I plugged my headphones in the H4n, allowing me to monitor both my laptop’s audio and my microphone input with zero added latency. I simply needed an old USB-A to Mini USB-B cable—no power supply required.
The only downside was that my H4n is quite old, so the rubbery grip feels a bit grubby and sticky.
Microphone: Rode SmartLav+ (January 2017)
For the microphone, I decided to go for the Rode SmartLav+ lapel mic.
Its small size is perfect for traveling, and using a lavalier mic means I have my hands free for typing and browsing. This is a good alternative to dynamic mics like the Shure SM58, which also require a bulky XLR cable.
I was pleasantly surprised by this mic. My voice was clear and at a good level, with very little background noise or room reverb.
It needs plug-in power (which my Zoom H4n delivers) and an additional TRRS1 to TRS adaptor to connect to the audio interface (I used the SC3).
I wasn’t too sure if it was going to fit the bill, so I had a backup plan: a Prodipe TT1 Pro dynamic microphone with an XLR cable. I was prepared to hold it for the whole show if necessary (although I’m sure there’s a mic stand somewhere in this house!).
Headphones: iPhone earbuds
Simplicity and portability were my main criteria, so I used the standard Apple iPhone earbuds for monitoring audio, rather than my larger Beyerdynamic DT770 Pro headphones.
Sometimes, the best solution is the one that works!
Light: Aputure MC
This is one of the items in this list that I bought more recently (mid 2022).
While not strictly necessary, I did pack this little customisable RGBWW2 light to make up for the potato quality of my Macbook webcam. You’d be surprised how much of a difference a small, well placed light source makes!
As a bonus, the Aputure MC lets you change the colour temperature to adapt to your room conditions; I used this to make it look a bit warmer.
A cool feature is the ability to save and recall presets via the Sidus app (though I didn’t need it this time). Also it’s magnetic, so you can stick it on some metal surfaces, and boom, you’ve got yourself a light stand!
Light Tripod: Joby Telepod
I used a small Joby tripod as a light stand; I think it’s the Telepod Mobile (now discontinued), but I wouldn’t swear to it.
It is light and sturdy, with a standard thread that fits cameras, small lights and audio recorders.
I didn’t really need it, but it was so light and compact I packed it anyway. I could also have used it as a video tripod if I’d decided to use my iPhone as a webcam.
Outro
It turns out that in 2024, you don’t need the latest and most expensive tech to be able to join a live stream.
I got perfectly good results with a core setup that was at least nine years old (bar the lighting3, which wasn’t essential)
The lesson here is: if your gear is a bit old, don’t let that stop you.
Just start. It’ll do just fine. You can always iterate on your setup.
